ShopHandmade

Monday, April 18, 2011

Spiral Paper Clips Tutorial

Here's a really fun little project that I do fairly often. It uses up spare bits of wire because you need relatively little wire in order to make each one. Paper clips are a really fun project that everyone has a use for, and it can be modified in so many ways. For gifts, try mixing it up using color coated wire in thematic colors, for instance! These are just a lot of fun!!!!

Another great thing about this project is that it can be accomplished with almost any gauge, color, and temper of wire - I would suggest using at least 22g or thicker, for sturdiness.

For the sake of visibility, I'm using 16g copper wire for this tutorial

1) Cut a piece of wire approximately 4" long

2) Using your round-nose pliers or rosary pliers, make a loose spiral on one end of the wire

3) Make a similar loose spiral at the other end of the wire, facing in the same direction. Leave about 3/4" of space between the two spirals

At this point, if you're using thinner or dead soft wire, it can't hurt to hammer the spirals a bit for strength. Don't hammer the space between the spirals; you want to keep that somewhat flexible for the next step.

4) Gently push the two spirals toward each other until one overlaps the other


You now have a cute, decorative little paperclip. Simply clip two beautiful pieces of paper together with it!


Now that you've mastered these little guys, mix it up a little. Try making really large spirals, hammering a texture into them, or try making leaf or heart shapes for the front part of the paperclip. The possibilities are endless, and these take only a minute or so apiece to make. Have fun!!!!!

Thursday, April 14, 2011

Using the Leftovers

Yesterday, I blogged about the Artbeads Design Partners Challenge. Well, seeing as it's never wise to get just barely enough materials for any project (you always want a couple of extra, just in case) and since I had ordered more jump rings because I had planned on adding them into the beaded part of the bracelet yet decided against it, I still have a number of brass jump rings. Enough to do a chain maille bracelet. And that sort of temptation, my beady friends, is often simply too much for me to bear.

So here's what came out of the leftovers, and there's a bit of evolution to the piece.

Now again I probably should have snapped a picture of the components as I was beginning, but again I lacked the necessary foresight to do this. <sigh> Sooner or later I'll learn.

Anyway....

Ages ago I received a brass bead cap as part of a sort of bead mix swap, and it was the only one so it was never used. While playing around with it trying to decide if I had a suitable bead to cap it with, I idly started prying the "petals" apart with my pliers. When I looked down and realized what I was doing, I thought "Boy, I'll bet a Swarovski Rivoli would fit nicely in there!"

And wouldn't you know it, I happened to have a little package of Rivolis that I hadn't entirely used up yet. I love having a bead stash!!!!!

I added a few inches of Byzantine chain to either side, and originally came up with this bracelet:


Now I felt that this looked quite nice, actually, but when I wore the bracelet (these things MUST be test-driven, you understand!!!) the stone kept flipping upside down on me, showing the unadorned back of the brass bead-cap-cum-bezel-setting. Well, that's no good. So I decided to stabilize it a bit. Here's what I did:


Those extra little bits of Byzantine chain REALLY helped to stabilize it, and also created a nice little nest from which the Rivoli could sparkle out from the depths. 

I'm having an internal debate about whether or not this should go into my store. Until I can find more of exactly the right bead caps I'm not sure I could duplicate this, but the design looks so rich and intricate I'd love to have it out there, so I simply thought I would share!!!! Thanks for peeking!

Wednesday, April 13, 2011

Artbeads Design Challenge - What's Old is New Again

The Artbeads Design Partners Challenges are a new thing for me, but boy is this fun!!!! There’s something very special about designing jewelry for a purpose; whether that purpose is a friend, a theme, a color scheme – what have you.

I also LOVE vintage styles, so when I learned the theme of this challenge was “What’s Old is New Again” I dissolved in silly, girlish little squeals of delight. It doesn’t take much to make me happy.
So we begin with something old.

Many moons ago, I found this wonderful brass flower findings on Etsy – I can’t remember the name of the seller who supplied them, so I can’t link you to her, but I just LOVED the possibilities of these. I should have taken a picture before I used them, but I seem to lack that amount of foresight currently. Instead, I’ll show you here the first project I did with those flowers, a matching necklace and earrings set:


Note the stunning photographic stylings of my ΓΌber-talented cousin Deirdre Stearns-Wingell.
Well, this set was broken up (I sold the earrings) but I still had the necklace kicking around. It wasn’t going anywhere, and I decided it would make a really nice “something old” for this vintage-y challenge – and what looks more vintage than the warm subtle glow of brass??

If you’ve been following my blog, you’ll also notice the shaggy chain bracelets I’ve been making over the last month or so. I simply can’t stop making them!!!!  Yes, they use up more beads than your average necklace. Yes, I’ve almost literally blitzed through my bead stash in the last several weeks making them. And yes, I think I’ve now reached “wrapped loop burnout” from making them, but that doesn’t make me any less happy when I see my finished piece for this challenge.

If you’ve ever seen the movie “Midnight in the Garden of Good and Evil” you’ll remember the stately mystique of the city of Savannah, GA. I’ve never been there myself, but when I think of the city (and the movie) it conjures up images of women in flowered dresses drinking tea on a hot day while strands of Wisteria and Spanish Moss flutter on the breeze around them. I think of bees buzzing gently around a garden of tea roses, and I think of bouquets of large, exotic flowers that don’t make me sneeze. If these images don’t appeal to you, perhaps the thought of John Cusack and Kevin Spacey sharing the screen for a really dramatic murder mystery will!!

So with these images in mind, and a big honking brass flower in hand, I designed my challenge piece and dubbed it “Midnight in the Garden of Bees and Flowers.” This is fortunate, because the working title of the piece was “Too Many Damned Wrapped Loops”


As with so many of my recent bracelets, this began with a handmade base chain, using brass jump rings. You can get all of the brass findings (including head pins, the beautiful flowery toggle clasp, and that cute little bee charm) for a similar bracelet here:

Next came the fun part … what beads to use????

If there’s one thing that is at least as classically vintage as brass, it’s pearls. I chose Swarovski pearls in 2 sizes, and chose the Platinum shade which I felt complimented the warm tones of the brass. Then I added Swarovski Margaritas in Siam for color.

I finished to this point, and decided that the bracelet did not feel complete. Digging through my dwindling bead stash, I came across some small Swarovski pearls in a gorgeous deep red shade (I think it’s Bordeaux, but I’m not 100% certain) and added them. You can purchase all of the beads used at Artbeads also right here:

I do hope you’ve had half as much fun peeking at this little creation as I had making it!!!! Thank you so much to Duchess and everyone art Artbeads!!!!


Necessary legal stuff:
I’m not employed by or being paid by Artbeads, and the opinions expressed in this blog are honest and completely my own. I received the following products free of charge from Artbeads :

Wednesday, March 23, 2011

The Evolution of a Bracelet Design - Pt II

By this time, I was completely addicted to these charming little bracelets. They're fun to make, lovely to handle, and the fluffy factor is just divine. But I was running out of cable chain!!! I needed to go through my bead stash!!

I sacrificed a rather old and well-loved multi-strand necklace made long ago in my early jewelry making days. Yes, it was a bit of a wrench letting go, but the one necklace ultimately contributed to the next 3 bracelets I have to show you. The first was this very steampunk version of the chain fringe bracelet, which really played on mixing up those metals:


A second, similar one contained just a hint of blue, but kept to the neutral, metallic color palette for most of the bracelet. Little brass bells, large twisted jump rings, and the many different colors of metals used in the bracelet give this a really wonderful texture:


And here, a much brighter gold one showcases some blue czech glass pearls. This one strikes me as being slightly more decadent-feeling, perhaps because of the uniform beads and the rich gold tones:


Still more to come ... keep an eye out for Part III...

Monday, March 21, 2011

The Evolution of a Bracelet Design Part I

There's a fad that's been building over the last couple of seasons in jewelry - a sort of "messy chain" fad. Usually several strands of fine, tangled cable chain are involved - I'm sure you've seen the type of thing I'm talking about. The fringe-y look of layer upon layer of chain, not always matching chain, is kind of eye-catching.

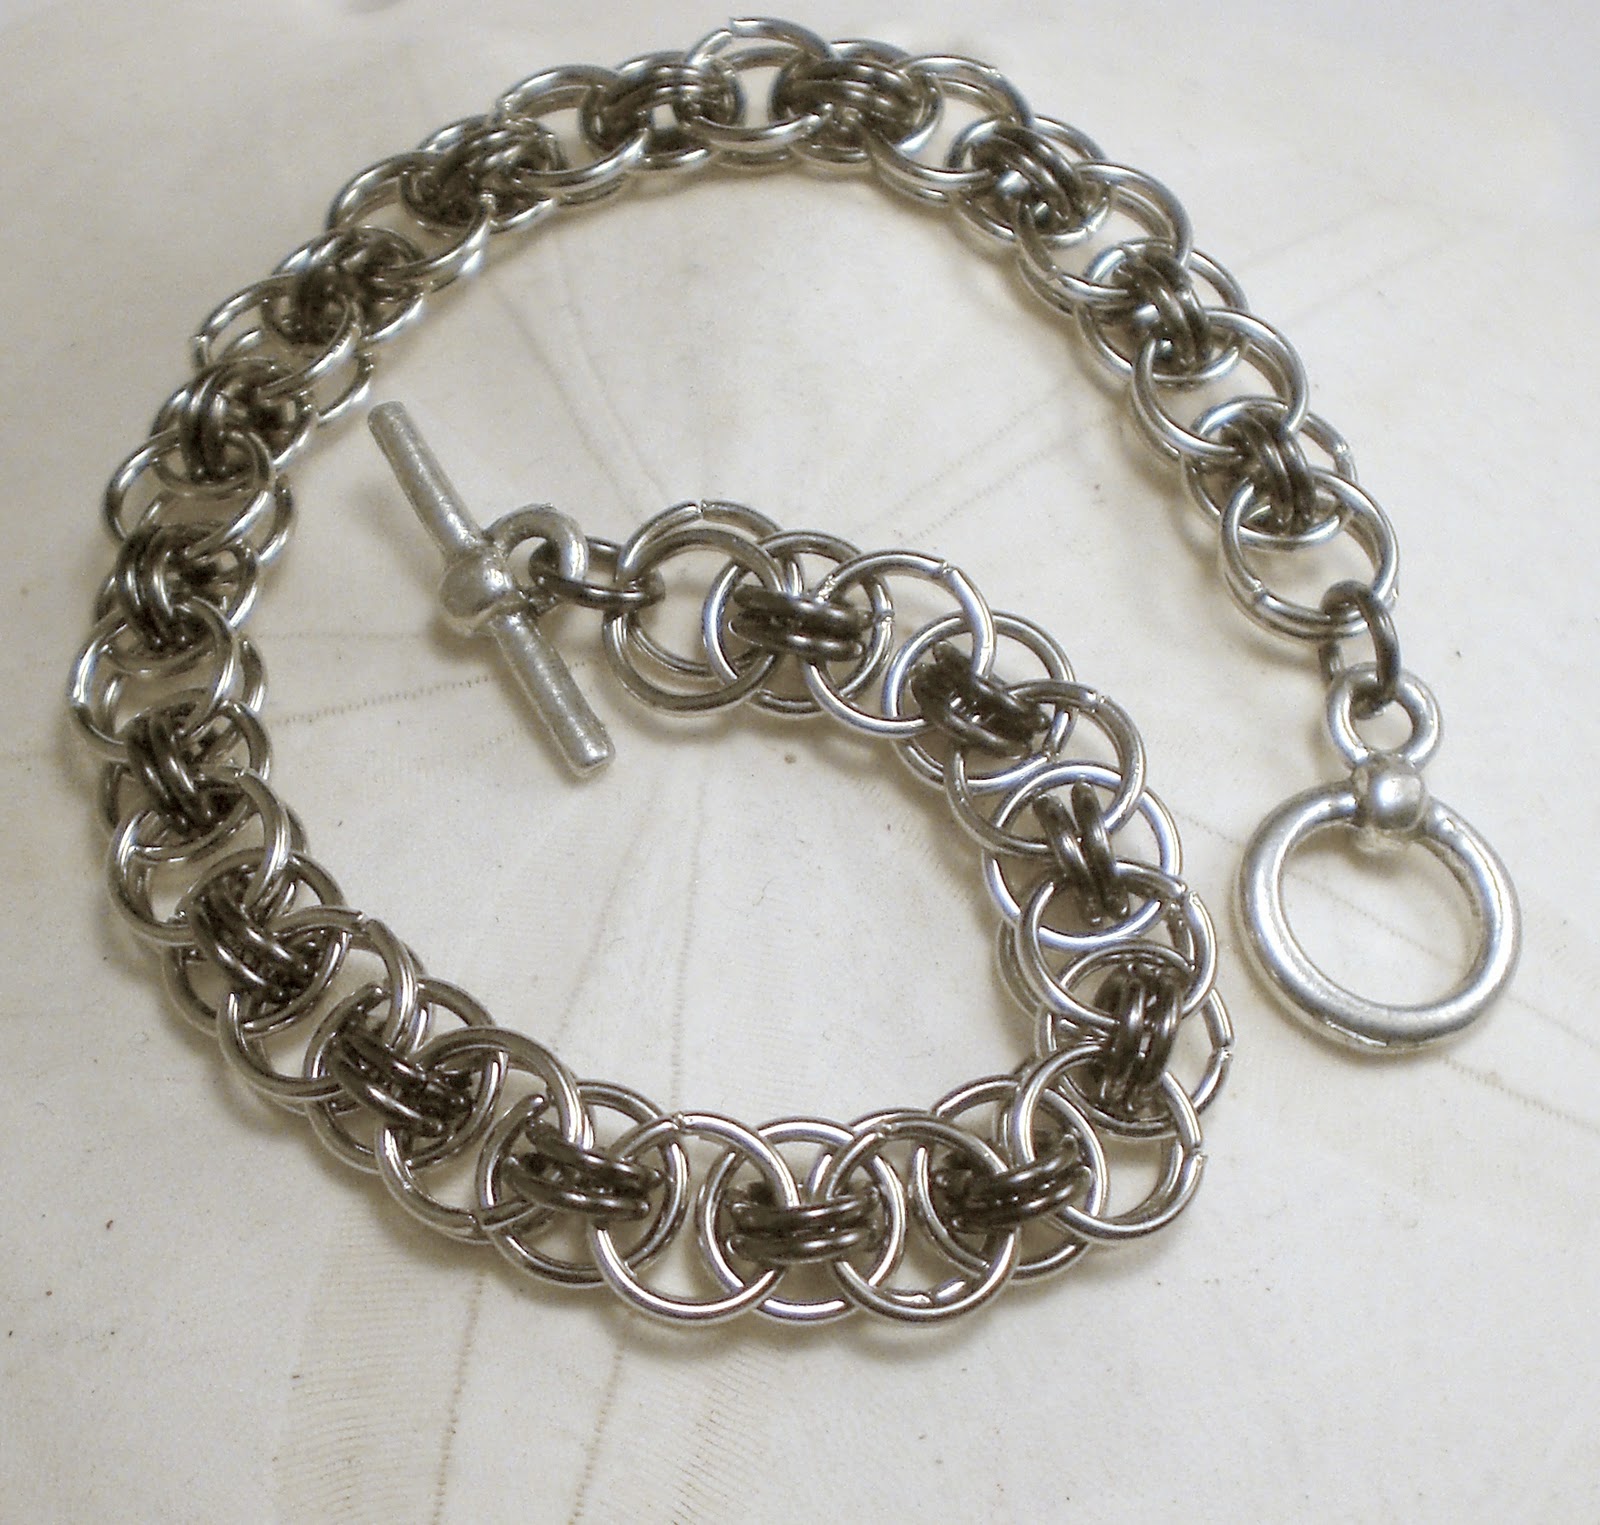
As many of you know, I'm a HUGE fan of chain jewelry. I love the weight and sound of the metal, the texture of it. I recently learned how to do Helm Chain - here's an example of a plain Helm Chain bracelet:


Naturally, it wasn't long before it occurred to me that those small jump rings would provide great little spots to hang dangly beaded stuff. After all, what good is chain maille if you can't hang dangly beaded stuff off of it occasionally?

Well, the very next bracelet to come out of this thought was what I'm calling my "Bacchus Bracelet" - guess why?


Now this brought me to a bead hunt; I needed to do something pretty fabulous with the next bracelet. Various shapes of Montana Blue Swarovskis and some bright faux pearls were a great start, but I wanted to see something more going on in there. Finally, the idea struck me to add tiny bits of chain to each dangle. What a difference!


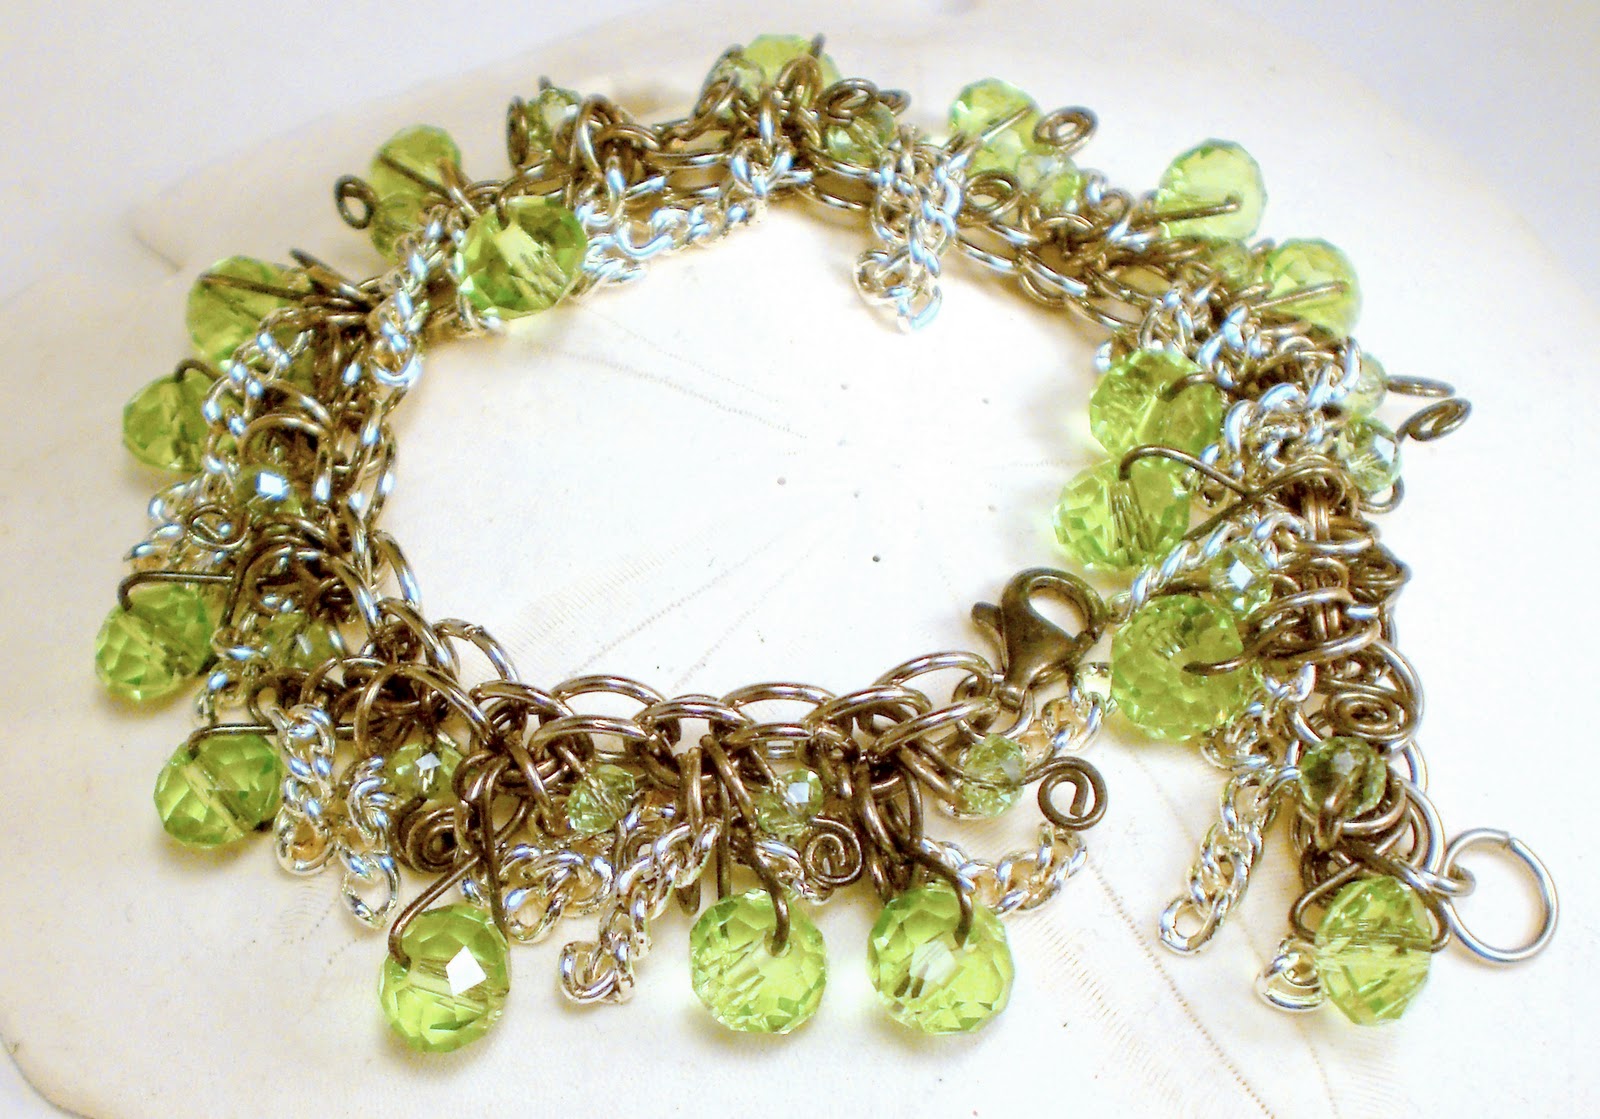
The next one was made with peridot colored crystals, but I thought it seemed a little too brightly white:


So I used a hard-boiled egg to add a patina to the silver. This worked to a certain extent; much of the silver plated stuff in there aged, but the chain must have been made of stainless steel, because it managed to stay a bright white after the aging process:


Of course, I was amazed at the depth of detail now visible around the metalwork!

Of course, I wasn't done yet! Stay tuned for Part II.....

Thursday, December 9, 2010

Handmade Holiday 2 Featuring Popnicute

So today I'm back featuring one of my all-time favorite wire artists. Kharisma (Kay) Sommers is the wire whisperer behind Popnicute. She shares her secrets and some of the supplies on her Popnicute Supplies site, also on Artfire.

This first piece of art, the Wire Bow Necklace, was my inspiration for this blog post. I love the ribbon effect she created with the wire! I'd never seen anything like it before! The stone is Blue Chalcedony and it's wrapped in Argentium Sterling Silver. So give the perfect gift this year: a perfect gift!


Angel Wing Earrings. How cool are these? I love the delicate loops and swirls that form the wing shape, and people that aren't crazy for long dangles (gasp!!!) would love these! They'd make a cute addition to anyone's holiday attire!


I LOVE the graceful curves in this Cross Pendant. I've been eying it for weeks myself, thinking of making a simple chain from antiqued copper jump rings to suspend it from.


Let the toppers for your presents be the gift! Look at this amazing Flower Gift Ribbon pendant executed in delicate loops of polymer clay and adorned with a single sparkly crystal. The fun pom-pom shape in it's muted green tone would be a gift topper that you can enjoy wearing all year round.


So head on over to Kay's store to see more of her fantastic work, and I hope you enjoyed this holiday featurette! Stay tuned for more this week!!!

Tuesday, December 7, 2010

Handmade Holiday Featuring BooBeads

Every year around this time, the whole world seems to turn red, white, and green. Bright baubles hang everywhere you look, Christmas trees twinkle in the early evenings, and we all have these wonderful, comforting thoughts about hot chocolate, Santa Clause, and snowmen.

Every year I'm astounded by the Christmas designs people come up with. You would think we beaders would have exhausted most of our holiday possibilities by now, but new and completely innovative designs keep cropping up. Over the next week or so, I'd like to feature some of the amazing specifically Christmas designs that I and my friends have done this year.

The first shop I'd like to visit is BooBeads run by the chic and talented Cat Pruitt. Cat's talents are wide ranging: she does beautiful stringing work, gorgeous wire work, some beadweaving, and lately she has been branching into the wonderful world of metal-smithing, and I find myself casting an envious eye over her results. To hear more about her adventures in metal-smithing, check out her blog.

These earrings are one of the reasons I wanted to do a blog about Cat. I’ve seen all sorts of Christmas themed earrings, but her “Mr. and Mrs. Santa Claus Earrings” truly take the cake!


The next piece of Cat’s that I particularly love is this Winter Wonderland charm bracelet. Cat has a wonderful eye for color, and that comes through in the mix of silver, white, and pale blue that makes this piece sparkle like the day after an ice storm.


I was raised Catholic, and Christmas Eve was a time of elegance and opulence. Here’s a wonderful pair of Cosmic Star Flower Earrings that are elegant enough for Midnight Mass, but innocuous enough to wear all year round! I love the dazzling colors in the faux Mexican opal, and the striking balance the create with the silver settings!


Of course, no Christmas season is complete without a Christmas Tree, and Cat’s Christmas Tree Earrings are simply perfect!


Lastly, I’d like to show another piece of Cat’s that, while it’s great for Christmas, is also wearable at any time of year… and that’s the lovely dove pendant in her Soaring in Flight necklace.


Spend an hour or so oohing and aaahing at the other amazing pieces in Cat’s Artfire store, and stay tuned this week for more Handmade Holiday Artist features!!!